 Changing your air filter is one of the easiest ways to protect your HVAC system and improve air quality.
Do it right, do it regularly, and you’ll avoid a lot of unnecessary problems.
First—
Furnace filter, AC filter, HVAC filter = same thing.
It’s the filter your system uses year-round to keep air clean and protect equipment.
You’ll find it in a return vent, air handler, or furnace cabinet.
We’ll show the steps in the video—this is what to know so you don’t mess it up.
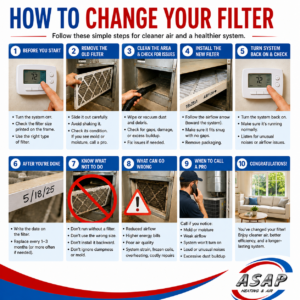
1. Before You Start
Turn the system OFF
Don’t skip this. Running the system without a filter (even briefly) can pull dust straight into the equipment.
Check the filter size
It’s printed on the frame (example: 16x25x1).
Wrong size = gaps = unfiltered air getting through.
Use the right type of filter
- Basic (fiberglass): minimal filtration
- Pleated: better for dust, pollen, allergens
- High-MERV: stronger filtration, but don’t oversize beyond what your system can handle
If unsure, stick with what’s already working or ask a pro.
2. Remove the Old Filter
Slide it out carefully
Avoid shaking it—dust and debris can spread.
Check its condition
- Extremely dirty → you may need to change filters more often
- Damp or musty → possible moisture issue
- Mold spots → stop and investigate
👉 If you see mold or moisture, don’t just replace it—call a professional.
3. While the Filter Is Out (Don’t Skip This)
This is where most people miss easy wins.
Clean the area
- Wipe out dust inside the slot or vent
- Vacuum loose debris if needed
Check for issues
- Gaps around where the filter sits
- Bent or damaged housing
- Excess dust buildup deeper in the system
If anything looks off, it’s worth getting it checked.
4. Install the New Filter (Correctly)
Follow the airflow arrow
There’s always an arrow on the frame. It should point toward the system, not toward the room.
Wrong direction = restricted airflow + system strain.
Make sure it fits snug
No gaps, no bending, no forcing it in.
Remove packaging
Yes, this gets missed. Don’t install it wrapped.
5. Turn System Back On & Check
Once installed:
- Turn the system back on
- Make sure it’s running normally
- Listen for unusual noise or airflow issues
If something sounds off, don’t ignore it.
6. After You’re Done
Write the date on the filter
Simple, but it works. You’ll know exactly when to change it next.
Know how often to change it
Typical: every 1–3 months
Change it more often if:
- You have pets
- Allergies or asthma in the home
- High dust, wind, or wildfire exposure
- Large household or heavy system use
7. What NOT to Do
- Don’t run your system without a filter
- Don’t use the wrong size filter
- Don’t install it backward
- Don’t ignore a damp or moldy filter
- Don’t assume “it’s fine” if airflow feels weak
8. What Can Go Wrong (and Why It Matters)
A dirty or incorrect filter can cause:
- Reduced airflow
- Higher energy bills
- Poor air quality
- System strain and premature failure
In some cases, it can even lead to:
- Frozen coils
- Overheating
- Costly repairs
9. When to Call a ASAP Heating and Air
Call if you notice:
- Mold or moisture on the filter
- System won’t turn back on
- Weak airflow even with a new filter
- Loud or unusual noises
- Excessive dust buildup
10. Congratulations! You’ve changed your filter!
Until we make our own video, here’s one from Ryan Homes you may like.